Saturday, August 19, 2006

Free forever

LiveWriter OnScreen is free. Free as in free beer, not as in freedom.

Its free today, free tomorrow and free forever.

You need to install LiveWriter before you install LiveWriter OnScreen.


see the help for details.

image

tags: , ,

Seamless snip and blog

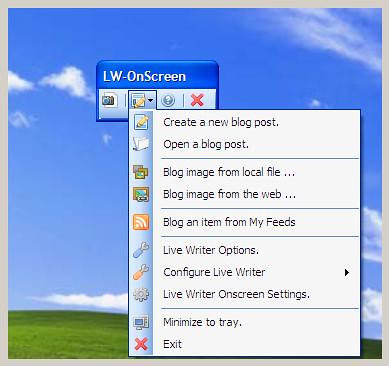
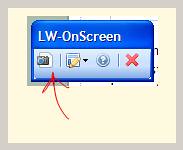
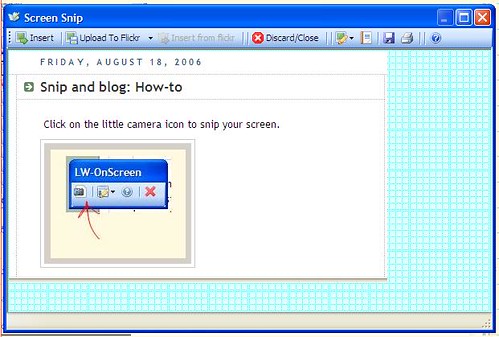
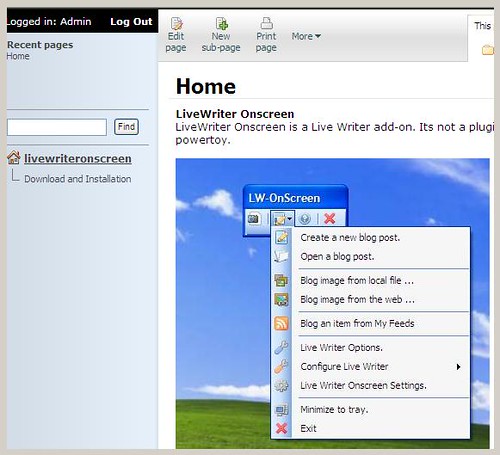
 The default user experience for LiveWriter-OnScreen is  "Snip and Blog"(a phrase from my design notes). 

I insist on using a free photo-sharing site to save my screen snips so Snip and Blog would only make sense if I could upload my screen snips somewhere free. That's why we do the flickr upload. You can also insert the screen snip without uploading to flickr, but then you'll need to have an FTP server set up to upload images.

I am especially happy with the "Blog item from my feeds" feature which was never in the initial design, but just made sense.

Having an onscreen mode lets me blog like I do email, all the time. (saves a few clicks too)

The two features that I really wanted were "Snip and Blog" and "Blog my feeds". All the other features were either easy or side-effects.


Visit the help for more information


The LiveWriter team is working on an "Insert Screen snip" plugin (mentioned in LiveSide with J.J. Allaire)

LiveWriter-OnScreen Help

Use any of the links below to view a specific help topic:

  • Download and Installation
  • Blog image from file or web
  • Screen snips on flickr
  • Screen Snip editor: How-to
  • Snip and blog: How-to
  • Yes you need a flickr account
  • Built-in Feeds viewer


    The main screen. LiveWriter-OnScreen runs in normal mode (as shown below) and tray mode (minimized to the system tray). image


     Click on the little camera icon to snip your screen.

    image

  •  

    After you clip your screen the Screen snip editor is displayed as below.

    view large size

    You can then :

    • upload to flickr, and then insert the screen snip in a writer post
    • insert the screen snip in a writer post (the snip is saved locally)
    • save the screen snip
    • print the screen snip
  • tags: , ,

  • Download and Installation

    Requirements

    The requirements for LiveWriter Onscreen are:

    Download location

    You can download the installer from here


    Installation:

    1. download the installer from here .
    2.  save the installer file on your computer. The installer file name is  SetupLiveWriterOnscreen.msi
    3. double-click on the installer file and follow the instructions.
    4. You get to choose where you want to install LiveWriter OnScreen.
    5. After the install a shortcut will be added to your desktop and your programs menu.

    You can also install by clicking on SetupLiveWriterOnscreen.msi , and running the installer without saving it to your computer.

    If you do not have IE7 installed, the installer will tell you that it cannot register 2 DLLs, ieframe.dll and msfeeds.dll. Click continue and complete the install. Everything should work ok. The only functionality that might not be available is the "blog item from my feeds".

    LiveWriter OnScreen wiki

     check out the LiveWriter OnScreen wiki for detailed download and installation instructions.

    tags: , ,

    Blog image from file or web

     You can use LiveWriter Onscreen to blog an image from the web or from a file.

    Select "Blog image from local file" or  "Blog image from web".

    A dialog window like the one shown below is displayed. Enter the title for the image and comments and click ok. LiveWriter will be launched with the title, comments and selected image inserted into the editor. Now you can blog away.

    These images will be uploaded to your pre-configured FTP server.


    tags: , ,